
The shift to solventless
I've seen a massive shift toward live rosin lately. For a long time, butane hash oil (BHO) was the only way to get high-end concentrates, but solventless methods are winning people over. I prefer it because the flavor is actually there—you aren't just getting high; you're tasting the plant as it was when it was growing.
The core difference is the starting material. Live rosin begins with fresh frozen cannabis flower, preserving the plant’s natural terpenes that are often lost during the drying and curing processes used for BHO. This results in a concentrate that’s bursting with aroma and flavor. It’s a cleaner, more natural experience, and that’s resonating with consumers.
Traditionally, making dabs involved solvents like butane or propane to extract cannabinoids. While these methods can produce high-potency concentrates, they require specialized equipment and pose safety risks if not done correctly. Live rosin, however, relies solely on heat and pressure, making it a much safer option for home enthusiasts. It's a return to a more fundamental approach to cannabis extraction.
The technology around rosin pressing has improved dramatically. Early rosin presses were bulky and inefficient. Now, we have precise hydraulic and pneumatic systems offering incredible control. This means better yields, higher quality rosin, and a more consistent product. It’s a genuinely exciting time to be experimenting with cannabis concentrates.
The gear you need
This isn't a cheap hobby. You need a rosin press, and you'll usually choose between hydraulic or pneumatic. Hydraulic presses are the budget option—you can find a decent one for $300, but you'll be doing the physical work of cranking it. Pneumatic presses are faster and more consistent, but they usually cost over $1,000.
Size matters when it comes to your press. A smaller press is fine for personal use, but if you plan on processing larger quantities of material, you'll want a larger plate size. Next, you’ll need collection tools. A stainless steel dab tool is essential for scooping up the rosin. Parchment paper – unbleached is best – is used to collect the rosin during pressing. A good quality silicone mat to protect your press plates is also a smart investment.
The star of the show, of course, is your starting material. Fresh frozen flower is ideal. We’ll dive deeper into that in the next section. Alternatively, you can use bubble hash, which is a solventless extraction of trichomes. Micron bags are crucial for filtering out plant material. Different micron sizes (e.g., 25, 45, 73, 160) will filter out different particle sizes, resulting in varying levels of purity.
Pre-press molds are incredibly helpful for creating consistent pucks of material, which improves yield and prevents blowouts. Finally, you’ll need a way to heat your dabs. An e-nail or a banger are the most common options. Importantly, don’t skimp on safety. Wear heat-resistant gloves and eye protection throughout the process. Rosin pressing involves high temperatures and pressures, so caution is paramount.
- Rosin Press (Hydraulic or Pneumatic)
- Dab Tool (Stainless Steel)
- Parchment Paper (Unbleached)
- Silicone Mat
- Fresh frozen flower or bubble hash
- Micron Bags (Various Sizes)
- Pre-Press Mold
- E-Nail or Banger
- Heat-Resistant Gloves
- Eye Protection
Why fresh frozen flower is better
This is where a lot of people stumble. The “live” in live rosin isn’t just marketing. It refers to using fresh frozen cannabis flower. The goal is to preserve the terpenes as much as possible, and that means preventing degradation from heat, light, and air. Immediately after harvest, the flower needs to be flash-frozen and kept frozen until you’re ready to press.
Proper trimming is also essential. Remove any excess leaves or stems, as these contribute to lower yields and a less clean final product. The ideal moisture content is around 62-68%. Too dry, and the flower will crumble and yield less rosin. Too wet, and it will be difficult to press and may result in a lower quality product.
What if you can’t get your hands on fresh frozen flower? Can you use cured flower? Yes, you can, but be prepared for a noticeable difference in yield and terpene content. Cured flower loses a significant portion of its terpenes during the drying and curing process. The resulting rosin will still be potent, but it won't have the same vibrant aroma and flavor as live rosin.
Honestly, the difference is quite substantial. I’ve experimented with both, and the flavor profile of live rosin is significantly more complex and nuanced. If you're aiming for the highest quality rosin, fresh frozen flower is non-negotiable. It's the key to unlocking the full potential of your cannabis.
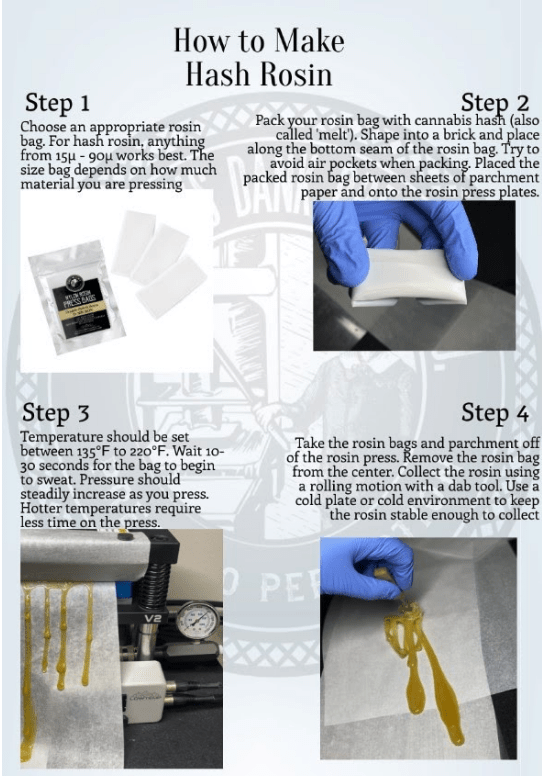
Bagging and Pre-Pressing
Now comes the meticulous part. Filling your micron bags correctly is vital for a clean and efficient press. Start by inserting the micron bag into your pre-press mold. Gently fill the bag with your fresh frozen flower or bubble hash, ensuring it’s evenly distributed. Don’t overfill the bag; leave some room for compression.
Different micron sizes filter out different particle sizes. A 25-micron bag will catch the smallest particles, resulting in the highest purity rosin, but it may also yield less. 45-micron bags are a good all-around choice, balancing purity and yield. 73 and 160-micron bags are used for larger particles and are often used in combination with finer micron bags.
Pre-pressing is arguably the most important step after getting the flower frozen. This compacts the material into a solid puck, which increases surface area and improves yield. Apply consistent pressure using your pre-press mold. The goal is to create a firm, dense puck without blowing out the bag. A good starting point is around 100-200 PSI, but this will vary depending on the amount of material and the quality of your flower.
I’m still researching the ideal pre-press time, and it seems to vary depending on the material. However, most experts recommend pre-pressing for around 5-10 minutes. The key is to check the puck periodically and ensure it’s becoming dense and compact without any signs of tearing or bulging. A blown bag means wasted material and a messy cleanup.
- Insert micron bag into pre-press mold.
- Gently fill with flower/hash, leaving room for compression.
- Apply consistent pressure (100-200 PSI).
- Pre-press for 5-10 minutes, checking for density.
Heat and pressure settings
Here's where the magic happens. Temperature and time are the two most critical factors influencing your yield and the quality of your rosin. Generally, lower temperatures (160-220°F) will preserve more terpenes, resulting in a more flavorful rosin with a saucy consistency. Higher temperatures (220-250°F) will yield more rosin, but it may be darker in color and have a less pronounced flavor profile.
The ideal temperature range will vary depending on the strain and your desired consistency. Sativas, with their more delicate terpene profiles, typically benefit from lower temperatures. Indicas, with their more robust terpene profiles, can handle slightly higher temperatures. Experimentation is key. Start with a lower temperature and gradually increase it until you find the sweet spot.
Pressure also plays a significant role. Higher pressure generally results in higher yields, but it also increases the risk of blowing out your bags. A good starting point is around 500-1000 PSI, but again, this will depend on your press and the material you’re using. Pressing time typically ranges from 3-5 minutes. Too short, and you won’t extract enough rosin. Too long, and you risk degrading the terpenes.
If you press too hot, the rosin will be dark and have a burnt flavor. If you press too cold, the rosin will be oily and difficult to collect. Finding the right balance between temperature, pressure, and time is an art form. Keep detailed notes of your settings and results to refine your technique over time. It's a process of constant learning and adjustment.
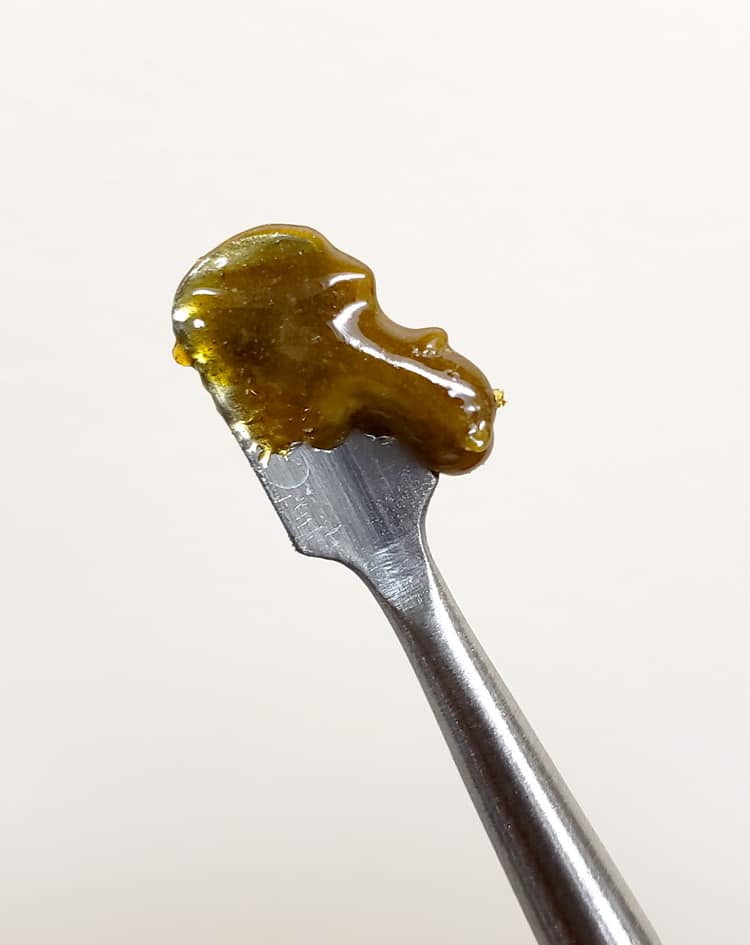
Collection and Cold Cure
Once the pressing is complete, carefully collect the rosin from the parchment paper using your stainless steel dab tool. Be gentle; the rosin is still warm and fragile. Work in a clean environment to prevent contamination. A dedicated rosin collection area is ideal.
The cold curing process significantly improves the flavor and consistency of your rosin. After collection, place the rosin in a sealed silicone container and store it in a cool, dark place (refrigerator is fine) for anywhere from 24 hours to several weeks. Curing allows the terpenes to stabilize and the rosin to develop a more complex flavor profile.
Shorter curing times (24-48 hours) will result in a more saucy consistency, while longer curing times (1-2 weeks) will result in a more buttery or badder-like consistency. Some people experiment with different curing techniques, such as using a vacuum chamber to remove air bubbles, but that’s getting into more advanced territory.
I’ve found that a week-long cold cure strikes a nice balance between flavor and consistency. The rosin becomes noticeably more aromatic and flavorful, and the texture is perfect for dabbing. It’s a step that’s well worth the effort.
Dabbing Your Live Rosin: A Flavor Journey
Now for the payoff! Dabbing live rosin is a completely different experience than dabbing BHO. The flavor is more pronounced, the high is cleaner, and the overall experience is more enjoyable. Start with a very small dab – seriously, less than you think you need. Live rosin is incredibly potent, and a little goes a long way.
Temperature is key when dabbing. Lower temperatures (around 400-500°F) will preserve more terpenes and provide a more flavorful experience. Higher temperatures (500-600°F) will produce a more intense high, but may also burn off some of the terpenes. A cold start dab—heating the banger and letting it cool before applying the rosin—is a popular technique for maximizing flavor.
Ensure your banger or nail is clean before each dab. Residue from previous dabs can significantly alter the flavor. A clean banger is a happy banger. Gently heat your banger or nail to the desired temperature. Once heated, allow it to cool slightly before adding your rosin.
Inhale slowly and steadily. Be mindful of your tolerance and adjust the dab size accordingly. It's always better to start small and work your way up. The goal is to find the sweet spot where you experience a potent, flavorful high without feeling overwhelmed. Remember to stay hydrated!
Troubleshooting Common Issues
Okay, things don’t always go as planned. Let’s address some common problems. Low yields are often caused by insufficient pressure, incorrect temperature, or low-quality starting material. Ensure you’re using enough pressure and that your flower is properly frozen. Dark rosin is usually a sign of overheating. Reduce the temperature and pressing time.
Oily rosin indicates that the temperature is too low or the pressure is insufficient. Increase the temperature and pressure slightly. Bags blowing out are often caused by overfilling the bags or applying too much pressure. Ensure you’re not overfilling the bags and start with a lower pressure. Pre-pressing is also vital to prevent blowouts.
Another common issue is rosin that’s difficult to collect. This can be caused by using parchment paper that’s too thin or not preheating your plates adequately. Use thicker parchment paper and ensure your plates are properly heated before pressing. Finally, contamination is always a risk. Work in a clean environment and use sterile tools.
Don’t get discouraged if you encounter problems. Rosin pressing is a learning process. Keep detailed notes of your settings and results, and don’t be afraid to experiment. Each strain is unique, and finding the optimal settings for each one takes time and practice.
Live Rosin Troubleshooting
| Problem | Possible Cause | Solution | Prevention |
|---|---|---|---|
| Low Yield | Insufficient pressure during pressing | Increase pressure on the press, ensuring even distribution. | Calibrate press regularly and use appropriate material quantity for bag size. |
| Low Yield | Starting material was too dry or improperly stored | Ensure fresh frozen material is used immediately after harvest or properly stored at very low temperatures. | Flash freeze material immediately after harvest and maintain a consistently frozen state until pressing. |
| Dark Rosin | Excessive heat applied during pressing | Reduce pressing temperature and/or shorten pressing time. | Start with lower temperature settings and incrementally increase while monitoring rosin color. |
| Dark Rosin | Over-pressing the material | Reduce pressing time and pressure. | Monitor the flow of rosin; stop pressing when flow slows significantly. |
| Oily Rosin | Insufficient heat applied during pressing | Increase pressing temperature slightly. | Experiment with temperature adjustments in small increments. |
| Oily Rosin | Material not fully frozen | Ensure material is completely frozen before pressing. | Verify material temperature before pressing – it should be thoroughly frozen. |
| Bag Blowout | Excessive pressure applied | Reduce pressure settings on the rosin press. | Start with lower pressure settings and gradually increase. |
| Bag Blowout | Bag material is compromised or too thin | Use high-quality rosin bags designed for the intended pressure and material. | Inspect bags for damage before each use and replace as needed. |
Illustrative comparison based on the article research brief. Verify current pricing, limits, and product details in the official docs before relying on it.


No comments yet. Be the first to share your thoughts!