
Why live rosin is better
Live rosin is the gold standard for dabs right now. Unlike BHO or PHO, it doesn't use chemicals to strip the plant. I prefer it because you actually taste the flower, not a lab's cleaning supplies. It's pure, it's potent, and it's easier to make at home than you might think.
To understand live rosin, it’s helpful to compare it to other extracts. Live resin, for example, also uses fresh frozen flower, but relies on hydrocarbon solvents like butane or propane for extraction. Traditional rosin, on the other hand, can be made with dried plant material. Live rosin, however, requires both fresh frozen flower and a solventless pressing process. This combination is what gives it a unique appeal.
The appeal of solventless concentrates extends beyond just avoiding potentially harmful chemicals. The full spectrum of cannabinoids and terpenes remains intact, leading to a more flavorful and potentially more effective experience. The increased demand is driving innovation in home extraction methods, making it more accessible than ever to create high-quality dabs yourself. Frankly, the quality you can achieve at home is often comparable to what you'd find in a dispensary, and for a fraction of the cost.
This guide will walk you through the entire process of making live rosin at home, from preparing the flower to pressing, collecting, and curing your final product. We’ll aim for a comprehensive overview, assuming you have a basic understanding of cannabis concentrates but are new to solventless extraction. We're talking about a shift in how people approach dabs, and it’s a really exciting time to be involved.
The gear you actually need
Okay, let's talk equipment. Making live rosin at home isn't a zero-cost endeavor, but it’s increasingly affordable. The biggest investment will be a rosin press. You have two main options: hydraulic and pneumatic. Hydraulic presses are generally more affordable, starting around $300-$500 for a decent entry-level model. Pneumatic presses, which use compressed air, offer more precise control but can cost $800 and up.
You need fresh frozen flower—and plenty of it. Start with a pound if you want a decent return. Grab a roll of unbleached, food-grade parchment paper and some basic stainless steel collection tools. A silicone mat helps keep your workspace clean, and you can usually find a kit for under $30.
Pre-press molds are highly recommended, although not strictly necessary. They help create pucks of flower that press more evenly, maximizing yield. These range from $20 for simple aluminum molds to $100+ for more sophisticated designs. Finally, a freezer is critical. You'll need a way to maintain your flower completely frozen before pressing, which we’ll discuss in the next section. A chest freezer is ideal, but a standard freezer can work if you’re diligent.
Here’s a rough breakdown of potential costs: Rosin press ($300-$1000+), Flower ($200-$500/lb), Parchment paper ($20/roll), Collection tools ($30), Pre-press molds ($20-$100+), Freezer (if needed, $200-$500). It's a commitment, but the ability to create your own high-quality dabs is a compelling return on investment.
- Rosin Press (hydraulic or pneumatic)
- Fresh Frozen Cannabis Flower
- Parchment Paper (unbleached, food-grade)
- Dab tools and silicone mats for collection
- Pre-Press Molds (optional, recommended)
- Freezer (chest freezer ideal)
Rosin Press Comparison for Home Live Rosin Production (2026)
| Press Type | Price Range | Capacity | Ease of Use | Maintenance |
|---|---|---|---|---|
| Hydraulic | Generally lower initial cost | Smaller batches, suitable for personal use | Requires manual force; learning curve to apply consistent pressure | Requires occasional oil changes and inspection of hydraulic components |
| Pneumatic | Mid-range cost | Can handle moderate batch sizes | Requires an air compressor; offers more consistent pressure than manual hydraulic presses | Requires maintenance of both the press and the air compressor; potential for air leaks |
| Electric | Higher initial cost | Variable, some models suitable for home use, others for larger production | Most user-friendly with digital controls for precise temperature and time settings | Generally lower maintenance than hydraulic or pneumatic, but electronic components can fail |
| Manual (Lever/Screw) | Lowest cost | Very small batches | Simple to operate, no electricity or air required | Minimal maintenance, but can be physically demanding |
| Hydraulic (with electric pump) | Mid-to-high cost | Moderate batch sizes | Combines ease of electric operation with hydraulic pressure | Requires maintenance of both hydraulic and electric components |
| Pneumatic (benchtop) | Mid-range cost | Small to moderate batch sizes | Offers consistent pressure with a compact air compressor | Requires maintenance of the press and compressor, but benchtop models are generally easier to manage |
Illustrative comparison based on the article research brief. Verify current pricing, limits, and product details in the official docs before relying on it.
Freezing and prepping flower
This step is often underestimated, but it’s arguably the most important. The key to live rosin is preserving the terpenes and cannabinoids present in the fresh flower. That means immediate freezing after harvest. The longer the flower sits at room temperature, the more you lose. Flash-freezing is the gold standard.
The process starts with trimming and bucking your flower. Remove the larger fan leaves and trim any excess foliage. This makes the material easier to work with and improves the quality of the final product. Once trimmed, place the flower in airtight bags or containers and get it into the freezer ASAP. You want to freeze it as quickly as possible to minimize ice crystal formation, which can damage the trichomes.
There are a few freezing methods to consider. Liquid nitrogen is the fastest, but it's expensive and requires specialized equipment and safety precautions. Dry ice is a more practical option for home growers, but it still needs careful handling. A standard freezer will work, but it’s the slowest method. If using a standard freezer, spread the flower out in a thin layer to promote faster freezing. The goal is to get it rock solid – completely frozen through – before pressing.
I've experimented with all three methods, and while liquid nitrogen yields the absolute best results, the difference between dry ice and a good freezer isn’t huge, especially if you’re meticulous about the process. Regardless of your method, ensure the flower remains frozen throughout the entire preparation and pressing process. Thawing even slightly will negatively impact yield and quality.
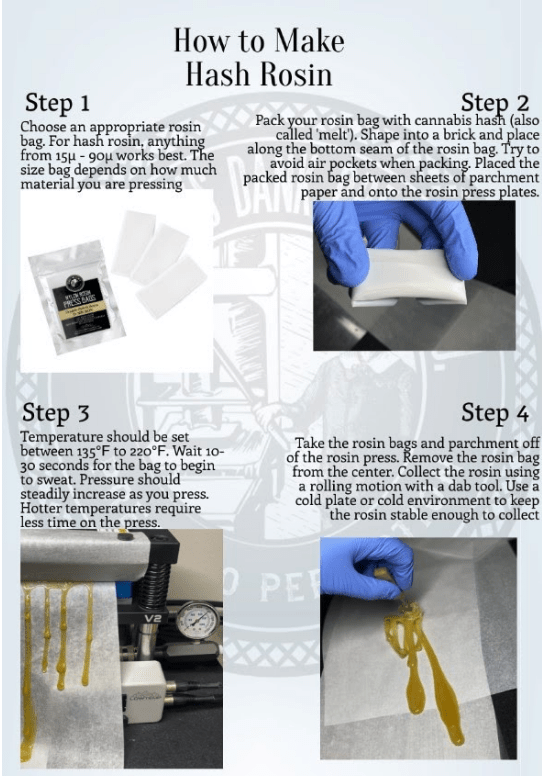
Heat and pressure settings
Alright, time to press! This is where things get interesting. Start by placing your frozen flower inside the pre-press mold and compressing it gently to form a puck. This helps with even distribution of pressure during the main press. Then, place the puck between two sheets of parchment paper and position it on the plates of your rosin press.
Temperature is critical. Lower temperatures (160-220°F / 71-104°C) generally yield a more flavorful, saucy rosin with a lighter color. Higher temperatures (220-250°F / 104-121°C) will increase yield but can result in a darker, more oxidized product. It’s a trade-off. The ideal temperature also depends on the strain – some strains press better at lower temps, while others need more heat.
Pressure is equally important. Start with low pressure and gradually increase it over the course of 3-5 minutes. The goal is to squeeze the rosin out of the plant material without burning it. You’ll feel resistance as the pressure increases. Watch the rosin carefully as it begins to flow onto the parchment paper. A good starting point is around 500-800 PSI, but you’ll need to adjust based on your press and the flower.
Pressing time typically ranges from 3-5 minutes. Don’t exceed 5 minutes, as this can lead to overheating and oxidation. As you gain experience, you’ll develop a feel for the “sweet spot” – the combination of temperature, pressure, and time that yields the best results for a particular strain. Safety first: always wear gloves and eye protection when operating a rosin press, and be mindful of the hot plates.
- Pre-press flower into a puck.
- Place puck between parchment paper.
- Position on rosin press plates.
- Start with low temperature (160-220°F).
- Gradually increase pressure over 3-5 minutes (500-800 PSI).
- Monitor rosin flow and adjust parameters.
- Do not exceed 5 minutes pressing time.
Post-Pressing: Collection & Curing
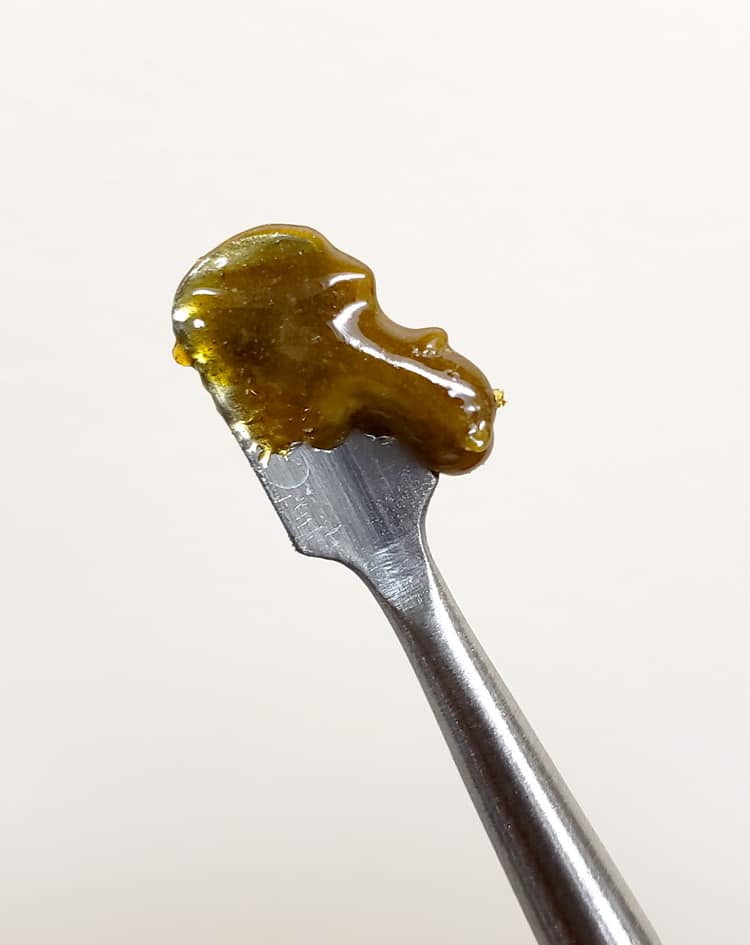
Once the pressing is complete, carefully remove the parchment paper and collect the rosin using your dab tool. It will be sticky and somewhat translucent. At this stage, the rosin is often quite wet and may contain some plant matter. Don’t worry, that’s normal. The initial collection is just the beginning.
Curing can significantly improve the flavor and consistency of your live rosin. Cold curing involves storing the rosin in an airtight container in the refrigerator for 24-72 hours. This allows the terpenes to stabilize and the rosin to separate into different consistencies. Room temperature curing is faster but can lead to some terpene loss.
Oxidation is the enemy of good rosin. Exposure to air and light can degrade the cannabinoids and terpenes, resulting in a loss of potency and flavor. Store your live rosin in an airtight, opaque container in a cool, dark place. The refrigerator is ideal for long-term storage. Properly stored rosin can maintain its quality for months.
I’ve found that cold curing typically results in a more complex and nuanced flavor profile. It’s a bit of a waiting game, but it’s well worth the effort. Experiment with different curing times to find what works best for your preferences. Don’t be afraid to try both methods and compare the results.
Troubleshooting Common Issues
Let’s address some common problems. Low yield is a frequent complaint. This can be caused by several factors: insufficient pressure, incorrect temperature, or poor-quality flower. Ensure your flower is completely frozen and that you’re applying enough pressure without overheating. Dark rosin often indicates that the temperature was too high or the pressing time was too long. Reduce the temperature and/or pressing time next time.
Oily rosin, which has a greasy texture, is usually a sign of incomplete pressing. Try increasing the pressure or extending the pressing time slightly. Burnt rosin is a clear indication that the temperature was too high. Unfortunately, there’s not much you can do to salvage burnt rosin. Prevention is key. Always start with a lower temperature and gradually increase it if needed.
Material quality is paramount. If you start with low-quality flower, you’re unlikely to get high-quality rosin. Look for flower that is rich in trichomes and free of mold or pests. Proper freezing is also essential. If the flower thaws even slightly, it will significantly reduce yield and quality. Finally, pay close attention to your pressing parameters. Experiment with different temperatures and pressures to find the sweet spot for each strain.
Diagnosing issues based on appearance is helpful. Rosin that is almost black is likely burnt. Rosin that is very thin and watery is likely under-pressed. Rosin that is a nice golden or amber color is generally a good sign. Keep detailed notes on your pressing parameters for each strain so you can replicate successful results.
Rosin Press Essentials
- Fresh Frozen Cannabis Flower - Using flower immediately after harvest, and flash frozen, maximizes terpene preservation for flavorful rosin.
- Rosin Press - Hydraulic presses are common, with options ranging from manual to automated, impacting yield and efficiency. Brands like DabPress and Nugsmasher are popular.
- Micron Filter Bags - These nylon mesh bags (typically 25-160 micron) separate plant material from the rosin, improving clarity and quality. Different micron sizes yield different consistencies.
- Parchment Paper - Used to contain the cannabis flower within the filter bag during pressing, preventing sticking and aiding collection.
- Collection Tool - A stainless steel dab tool is essential for scraping the rosin from the parchment paper. Avoid tools that may impart flavors.
- Silicone Containers - Non-stick silicone containers are ideal for storing the finished rosin, protecting its quality and preventing loss.
- Heat Gun or Torch - Used to heat your dabbing surface (banger or nail) to the correct temperature for vaporizing the rosin.


No comments yet. Be the first to share your thoughts!